Friday, March 9, 2012

Fresh Pasta


 Last Christmas Chris got me the pasta dough attachment for my KitchenAid mixer, which was a wonderfully thoughtful gift for someone who loves to cook and very convenient for that person's husband who has proclaimed himself "pasta deprived."  Remember I work in an Italian restaurant that specializes in fresh house-made pasta? And as I've mentioned before, they feed us. Four days a week I get pasta, which is more pasta than most people care to eat in a week.  So this wonderfully thoughtful gift had gone unopened... until yesterday when hours of free time and my nagging guilt conspired against me.

 I'm not gonna lie.  My first attempt at making pasta from scratch was  slightly less than impressive.

Typically, I over estimate my ability when I take a first stab at something labor intensive. So this time, I was prepared for disaster complete with cussing and loss of temper (check and check). After I regained my composure (read: poured a glass of wine)  I got out more eggs and flour and tried again.


The first batch of dough (recipe courtesy of kitchenAid) was too dry due to too much flour and ending flaking apart before I even got it into the roller.
The second batch was too sticky so I kept adding flour, a sprinkle at a time, until I got it just right. Only, having never made pasta before, I had no idea what just right felt like.
So I guessed.
 And for a first guess it came out pretty good, albeit a little thick, but none the less better than anything out of a box.

Here is what you will need: 
2 eggs
2 cups flour  plus additional for hands and work surface (I used unbleached pasta flour, AP will work too)
1/2 teaspoon salt
1-2 TBSP water


To start sift the flour and salt into a large bowl and make a well in the center to which you add the beaten eggs and water.

Using your hands begin to fold the flour over and into the eggs a little at a time. Once all flour is incorporated and has formed a rough ball move dough to a lightly floured work surface to knead.  I wasn't quite sure how to go about doing this so I went over to Jamie Oliver's site for advice and this is what he says:
 "Once you’ve made your dough you need to knead and work it with your hands to develop the gluten in the flour, otherwise your pasta will be flabby and soft when you cook it, instead of springy and al dente.

There’s no secret to kneading. You just have to bash the dough about a bit with your hands, squashing it into the table, reshaping it, pulling it, stretching it, squashing it again. It’s quite hard work, and after a few minutes it’s easy to see why the average Italian grandmother has arms like Frank Bruno! You’ll know when to stop – it’s when your pasta starts to feel smooth and silky instead of rough and floury. Then all you need to do is wrap it in cling film and put it in the fridge to rest for at least half an hour before you use it. Make sure the cling film covers it well or it will dry out and go crusty round the edges (this will give you crusty lumps through your pasta when you roll it out, and nobody likes crusty lumps!)."


And there it is, a perfect, smooth ball of dough (sans crusty lumps) just needing a little rest. Cover with saran wrap and set aside for 30 minutes.

 This is the easy and fun part. This is also where I made my biggest mistake. Per KitchenAid's instructions I set the roller to the largest or widest setting. Which resulted in really thick cooked pasta. Next time I'll run it through a few more times at a thinner setting. Easy fix.


Next, hire  your most favorite little person to help you collect the noodles as they pass through the pasta cutter.  Be sure to watch your little person's fingers, they tend to gravitate towards the pinchy rolley part of the machine.


My little person was "executive pasta hanger"  He ruled that hanging tree with an iron fist:
 "No mommy, no touch! Its my job"

It didn't really LOOK like all that much.

But after I cooked a small batch (with butter and broccoli) for Liam, saw how much I had made and how much I still had left. It was a boat load of pasta.


So I bagged and put the rest in the freezer. I have no idea if this is something that you can even do with any resulting success.  I know you can freeze unrolled dough, but since this is already cut... well I guess we will see. 

The rest of this post is superfluous because really, after all that, any sane person would just open a jar of marinara sauce and pour another glass of wine.

But on the off chance that YOU TOO have an excess of vegetables in your crisper  here's what I did:

 Chop em all up.  Here, I have a motley crew of red onion, broccoli, asparagus, parsnip and arugula.

 Toss into a hot saute pan with evoo, garlic, salt and pepper. Then take a blurry picture.

Do not forget the blurry picture, it is imperative.


 Open a can of diced tomatoes, because its not tomato season, and dump that in too.

 Simmer sauce for about 20 minutes.  Just before serving fold in the arugula.


And there you have it;  MONSTER noodles and fresh veggie tomato sauce.  Top with some shaved Parmesan, a drizzle of olive oil and savor every bite!


And then book yourself a spa day because DAMN if that wasn't a whole lotta work.

Tuesday, February 28, 2012

Caramelized Sea Scallops

I had to make two dinners tonight.

 But this, THIS was so worth the extra set of dirty dishes. 
Chris and his stubborn food preferences really missed out on an amazing meal.  Don't you miss out too!


Here is what you will need:
6-9 large sea scallops
1TBSP extra virgin olive oil
fresh sliced lemon & zest for garnish
I TBSP sugar
Salt and pepper to taste


Scallops are as quick and easy and as making a bowl of cereal. You just have to be pay close attention to them.  Kind of like and newborn in the bathtub; you cant turn your back on them, even for a second, or tragedy will strike.

To begin, remove the scallops from their packaging and give them a quick rinse at the sink. Using a clean paper towel pat them dry to wick away all excess moisture (if the scallops are too moist they will not caramelize in the pan).  Then sprinkle the scallops with salt and pepper.   Add the olive oil to coat a saute pan and heat to medium- high heat. Press each of your scallops into the sugar coating just the flat sides, then place them in the pan going in a clockwise direction starting at twelve. You should hear a firm sizzle when the scallop hits the pan, that means the pan is hot enough. Allow the scallops to sear for 2 minutes before turning, starting with the first scallop (at the 12'oclock location) and flipping each one. The seared side should be a beautiful caramel brown color.  Allow the second side to sear for an addition minute before removing  them to a serving dish. Your first instinct may be for leave them in the pan for longer, don't.  Trust me, just don't. If you overcook them they will become tough and rubbery like an old hot dog. These are lovely, lovely scallops, not old hot dogs so heed my warning!    Besides if they are fresh (ask the fishmonger when you buy them if you're unsure)  cooking them medium rare is not only safe, its preferred. 

Garnish with fresh lemon zest and serve with lemon wedges.

These scallops were tender and sweet and go wonderfully well with fresh peppery  baby arugula and asparagus risotto.  Make them soon and Savor Every Bite!

Monday, February 20, 2012

Black Bean & Sweet Potato Hash

If there is one thing you NEED to have with Pork Carnitas,  its this!

And really, its a snap; simply peel and dice a sweet potato, saute in 1 tablespoon of olive oil until just tender add 1 clove minced garlic, diced red onion and a healthy pinch of salt. Saute until the onion begins to sweat then add the black beans and favorite spices (I used a pinch of white pepper and cayenne)   Just before serving toss in all the cilantro your little heart desires.

Viola. If you make a big enough batch you can enjoy it for days, mine never lasts that long. 

Friday, October 21, 2011

Zucchini Cakes!

I know I sound like a damn broken record.
I know this.
But, truly, this IS one of my favorite things to make and then immediately scarf down. If I were alone I might skip the formality of a fork and just use my hands for faster delivery.


I came across this recipe years ago when my CSA box was overflowing with zucchini week after week and I was running out of ideas on how to prepare it. The collective groan that came from the dinner table was becoming a bit discouraging.

This recipe has been adapted from Pastor Ryan, over on PWC.

Here is what you will need:

1 large zucchini, shredded
1 clove garlic, minced
3/4 cup Italian herbed breadcrumbs
1/4 cup Parmesan Or Romano
2 eggs
Salt and pepper to taste
Olive Oil


On a clean dish towel grate the zucchini


Once grated, twist the shredded zucchini up in the towel and squeeze out the excess water.


It should be a decent amount. Discard.


Transfer the zucchini from the towel into a large bowl and add garlic, cheese, breadcrumbs, egg, salt and pepper.


Take your rings off and get your hands in there mixing everything together well. Taking about a tablespoon amount of zucchini, form patties between your palms.


Add olive oil to a saute pan and heat to medium.


Drop in zucchini cakes and saute each side for 3 minutes


or until golden brown.


Top with a little grated parm


and serve with marinara sauce.


Even the pickiest eaters will try it.


But best of all, they'll love it!


Enjoy!

Saturday, October 1, 2011

Homemade Chicken Pot Pie


Pot pie is one of my comfort foods. Whenever I am sick I send chris out to the store to get me juice and Marie Callendar's creamy mushroom and chicken pot pie. The problem with this is these pot pies are like eating a stick of butter. One serving is something like 35 grams of fat. So if you eat the whole thing, which I tend to do, well, its not good.


And so is born my homemade pot pie.


Here is what you will need:


Pie Crust, either store bought or homemade (If you dont have your own you can find my "go to- no fail" recipe here)


2 boneless chicken breasts, cooked and fork shredded


Use whatever vegetables you have leftover in the fridge. I always put carrot, onion, peas and corn in mine then whatever else I have on hand (mushrooms, zucchini, butternut squash, etc...)


1 cup corn (fresh if you can!)
1 medium zucchini, sliced
1/2 cup peas
1 small yellow onion diced
1/2 teaspoon minced garlic
2 Tablespoons all purpose flour
1 can (14 ounces) fat-free chicken broth
1/2 teaspoon dried thyme
2 tablespoons chopped parsley
1 tablespoons butter
1 tablespoon Evoo
1 can cream of potato soup (healthy options condensed)
1 teaspoon salt
1/2 teaspoon coarsely ground black pepper

In a large stock pot over medium heat melt the butter and add the onion, garlic and carrot until soft.
Sprinkle in the flour and cook for just a minute. Next add the stock and remaining vegetables, simmer on medium low and allow the sauce to thicken about 20 minutes. Add the potato soup, chicken, herbs salt and pepper and simmer until chicken is heated through. Remove from heat and set aside while you prepare the pie crusts.

I like for my bottom layer of crust to do its job and hold everything together so to keep it from getting soggy from the liquid filling I've got a little trick. Once you've got the bottom pie crust on your pie plate, poke the bottom with a fork, place on a cookie sheet and bake in the oven at 450 for ten minutes or until lightly browned. You don't want it cooked all the way through, you just want to toughen it up a bit.
Allow to cool before filling.
Top with second pie crust and pinch along the edges to seal, cutting away any excess dough.
Cut a few slits in the top crust to vent.
*If you want, and I always do, you can brush the top crust with an egg wash to get that glossy golden look.

Bake at 425 for 20 to 30 minutes until top crust is golden brown.

*If it looks like the edges are getting too dark just wrap a thin piece of aluminum foil around the edge of the pie and continue baking.


Top with a dash (or two ) of Texas Pete and prepare to meet your maker. You'll keel over dead, it's that good.

Friday, September 30, 2011

Slow Cooker Pork Carnitas.


I work in an Italian restaurant.  Its pretty amazing and I'm always proud to talk about the food we dish up there.  The ingredients are mostly local and in-season (right up my alley) which makes it serendipitous, for me anyway, that everyday before we open the cooks prepare us staff lunch.  We all sit down at the bar and fill up on whatever delicious concoction Jose has prepared for us (in case you were wondering Jose is not Italian). 
About a week or so ago I arrived for my shift a half hour early to clean and set up the bar in preparation for an impending health inspection. If you have ever worked in a restaurant for any amount of time you understand the weight of the phrase "impending health inspection".  No matter how careful and clean you are this health inspector will strike the fear of God, Himself into your heart.   She's nefariously good at what she does.  
I digress.
 So this particular day I was hunched over the soda gun with toothpicks and sanitizer when an amazing shredded pork dish comes to the bar for lunch. I still had quite a bit of work ahead of me before open so I plugged on working,  a decision that has haunted me ever since.  When 10 people dining together are completely silent, save for a few 'Mmms' and 'Yums' for the duration of a meal, you know its got to be delicious. 
That staff lunch was the inspiration for this recipe. I went straight home with the promise of shredded pork in my fridge for days to come.


Here is what you will need:

1 teaspoon salt
1 teaspoon ground cumin
1/2 teaspoon crumbled dried oregano
1/2 teaspoon ground coriander
a teeny pinch of ground cinnamon
1 (4 pound) boneless pork shoulder roast
 bay leaves
2 cups chicken broth

 Now, as you can see I used two small pork tenderloins instead of one large roast- because that's what I had in my freezer- so I cut the spice quantities in half.

Take all your dry ingredients and mix them together in a bowl

Coat the pork with the spice mixture
Place a few bay leaves on the bottom of your slow cooker

then place the pork on the bay leaves

measure our your stock/broth

and pour into your slow cooker, careful not to rinse the spices from the pork.

Now set it and forget it! 
(slow and low for 8 hours)


I don't have any photos of the succeeding steps because while this little beauty was cooking away I went to work and instructed Chris to do the shredding but not the photographing... Once the pork is finished remove it from the slow cooker and place on a cutting board. Using two forks shred the pork and return to the slow cooker so that the meat can absorb the Au jus.


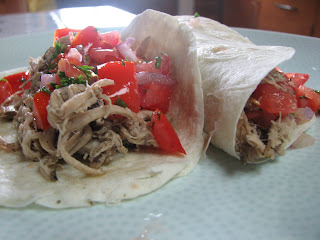
From here you can do just about anything from carnitas to risotto (I did both!)  For the carnitas add fresh pico de gallo, cilantro and a squeeze of fresh lime. To make a full meal add a side of black beans and roasted sweet potato. Pork and sweet potatoes were meant to be together.


Save the leftover pork for tomorrow's recipe, that is, if you have any.

Enjoy!

Monday, March 21, 2011

Sunday Dinner: Honey Dijon Pork Tenderloin.


Since the restaurant closed I've been able to do 'Sunday Dinners' whenever I please. Which means they've been happening less frequently on Sundays...but today I was in the cookin' mood and I had a wee little pork tenderloin in the fridge, some potatoes in the pantry and a good ol' fashioned can of peas just calling my name.

In defense of the peas, I love them canned. I do not love them frozen. And seeing as I am anxiously awaiting the arrival of my first CSA box of the season, it had to be canned.

Okay, back to the tenderloin.

My favorite way to prepare pork is to pair it with a sweet(ish) glaze or sauce. Also, I have seasonal allergies (stay with me here). Like, my- head- is- going- to- explode- from- the- intolerable- pressure- and- all- I- want- to- do- is- pull- the- covers- over- my- head- and- burrow- deeper- into- my- bed- allergies. So A good friend of mine suggested I get myself some local honey to combat the allergies. Every morning while the coffee is brewing a psych myself up to take a teaspoon of honey straight up. I shudder and choke as the nasty stuff slips slowly down my throat. Kitchen immunotherapy (sort of like bathroom surgery), if you will. You see, I hate honey so I'm scheming up a way to get the stuff into my system without provoking my gag reflex. And the idea hits me to make a glaze for the pork with the local honey. Kill two birds with one stone! Only, I didn't know, in order for the honey to work as an antidote is has to be raw; uncooked. Frig.

Well at least the pork was killer.

Here is what you will need:

1 boneless pork tenderloin
Salt and freshly cracked black pepper
2 TBSP white wine vinegar
3/4 cup Dijon mustard
2 TBSP Honey
1 TBSP fresh or dried parsley
a pinch or two of dried thyme
2 TBSP freshly chopped green onion or chives
2 TBSP evoo

My tenderloin was only 10 ounces so I just eyeballed the ingredients for my sauce. Taste as you go, if you want a more subtle mustard flavor adjust the honey and vinegar amounts.


Start with the tenderloin, mine was really well trimmed but you may need to remove the silver skin (the tough membrane that covers the top of the loin) from yours.


The secret to a really good sear is pat the meat down with a paper towel to wick away the moisture, then salt and pepper and set aside while you prepare the glaze.

In a small bowl mix together the mustard, honey, white wine vinegar, parsley, thyme and green onion. Now taste it and adjust to your liking.

In an oven proof saute pan (you'll be going from stove to oven back to stove) on med-high, heat up the olive oil
When its hot, place the tenderloin in the pan

and sear each side for about 30 seconds

until its nice and golden brown on all sides.


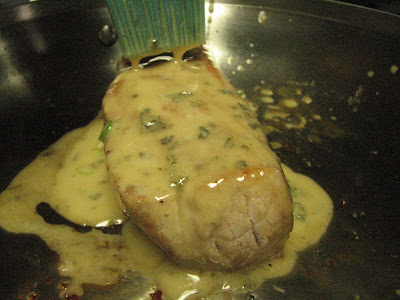
Remove pan from heat and baste the meat with the glaze.

Make sure you use it all, brushing all sides then cook in a 350 degree oven for about 20 minutes or until the tenderloin reaches and internal temperature of 145 degrees.


When the tenderloin is finished cooking remove it from the pan and let it rest on a cutting board for about 10 minutes.

While the pork is resting deglaze the pan. I don't have a photo of this step, sorry. There was a toddler having a melt down and a husband just getting home from work and, well, it slipped my mind. To deglaze take the saute pan with all the drippings and honey glaze and place it on the stove on medium heat. If you have a open bottle of nice white wine, you can use that, if not just use water. Pour the water/wine into the pan and with a wooden spatula or spoon scrape the fond (the caramelized bits of meat and sauce) from the bottom of the pan and stir adding enough water/wine to make a thin sauce to pour over your meat.

Just like so...


Pair it with a yummy green salad...


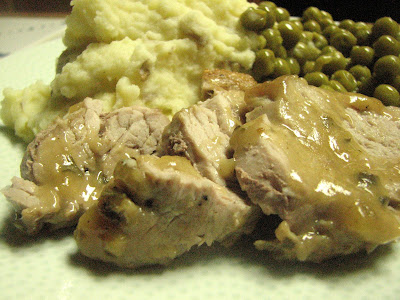
...mashed potatoes and peas and viola! Sunday dinner.

In theory now I would sit down with my husband and son and we would talk about how Chris's games went and the art project we worked on while daddy was working. Liam would eat his mashed potatoes and peas and push the pork around his plate after at least, giving it a try and then deciding he didn't care for it...

In practice, everything is on the table and were just sitting down to eat when I realize there are no serving spoons so I jump up to grab them, then Liam is spitting out his mashed potatoes into his hands and wringing his hands together then shaking them over the table spraying mashed potato bit and repeating the "S" word over and over because he doesn't like the texture. I jam a forkful of food into my face and chomp as I wipe his hands clean of potato. He refuses to try anything else on his plate and proceeds to cry when Chris and I make him sit with us at the table because DAMNIT this is SUNDAY DINNER! I munch a bit of salad and jump up from the table to microwave some leftover noodles and corn for Liam. By the time I get back to the table my plate is cold but at least Liam is eating something. Finally after a few fork fulls of noodles and corn we are defeated and let him down to go watch Thomas the train while we eat our thoughtfully prepared, yet cold dinners.

Just a day in the life.

Enjoy the pork Y'all.